
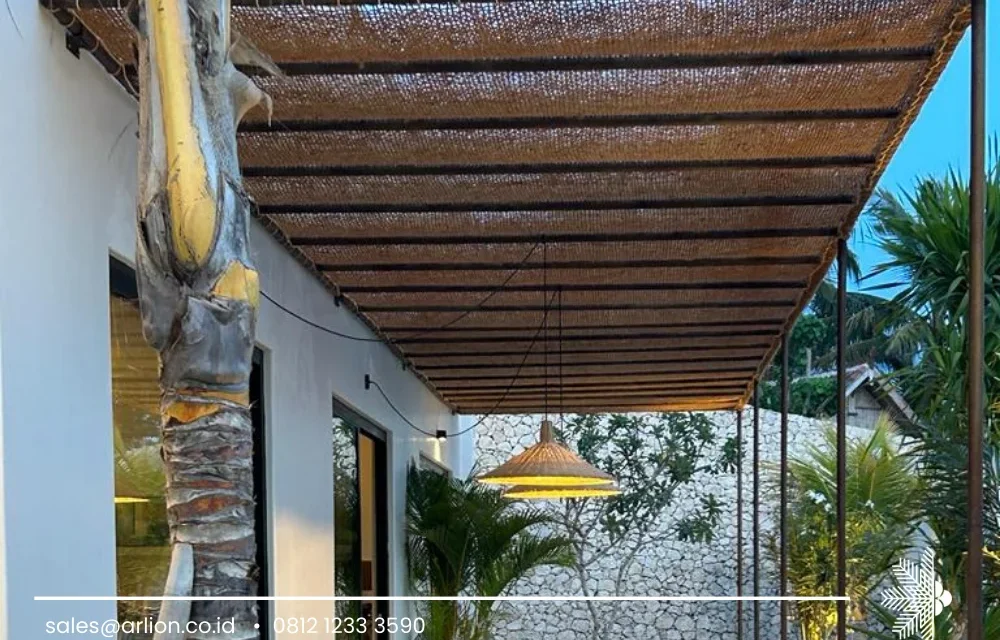
Did you know that DIY retractable shade sails can reduce indoor temperatures by up to 20 degrees Celsius during scorching summers? Imagine creating your cool oasis right in your backyard with a simple and cost-effective DIY pergola canopy solution. In this post, we unveil the secrets to effortlessly installing and enjoying the benefits of a DIY retractable shade sail. From enhancing outdoor living spaces with retractable shade cloth to protecting against harmful UV rays with retractable sun shade, discover how this versatile addition can transform your home into a comfortable retreat. Get ready to elevate your outdoor experience with a touch of innovation and practicality.

Materials and Tools
Essential Materials List
- Shade sail fabric: Provides UV protection and durability.
- Steel posts or wooden beams: Ensure stability for the shade sail.
- Mounting hardware: Includes turnbuckles, snap hooks, and eye bolts.
- Concrete mix: For securing the posts into the ground.
- Rope or cable: Used to attach the shade sail to the mounting points.
Required Tools Overview
- Drill: Essential for creating holes in the posts or beams.
- Measuring tape: Ensures accurate placement of mounting points.
- Hammer: Used for driving in any necessary nails or stakes.
- Level: Helps in ensuring that the shade sail is properly aligned.
- Paintbrush: For applying protective coatings on wooden components.
Optional Add-ons
- PVC pipes: Can be used to create a frame for additional support.
- Planks: Provide extra reinforcement for the shade sail structure.
- Image result rolls: Can be used to add decorative patterns to the shade sail fabric.
Preparing the Structure
Measure and Mark Area
To begin, measure the designated area where the shade sail will be installed using a tape measure. Mark the spots where the supporting structures will be placed.
Next, ensure that the measurements are accurate to guarantee a proper fit for the shade sail. Double-check the dimensions before proceeding with the installation.
Cut and Shape Support Bars
Cut the support bars according to the measurements taken earlier. Shape them into the required dimensions to fit the corresponding structure of the shade sail.
After cutting and shaping the support bars, position them in a parallel arrangement to provide adequate support for the shade sail. Adjust as needed to achieve a balanced and sturdy structure.
Install Eye Screws
Begin by selecting suitable eye screws that are compatible with the support bars. Install them securely at each marked spot on the structure to ensure proper attachment points for the shade sail.
Once the eye screws are in place, verify that they are firmly secured to prevent any potential issues during installation. Test their stability by applying gentle pressure before attaching the shade sail.
Assembling the Shade Sail
Cut and Sew Fabric
To start assembling the retractable canopy, carefully measure and cut the fabric according to your desired size. Sew the edges for a clean finish and enhanced durability.
Next, reinforce the corners by double stitching them to withstand tension and ensure longevity. This step is crucial for maintaining the structural integrity of the shade sail.
Attach Support Rods
After preparing the fabric, it’s time to attach the support rods. Position the rods along the edges of the fabric and secure them using sturdy hardware. Ensure that they are evenly spaced for balanced support.
Consider using durable materials like stainless steel or aluminium for the rods to withstand outdoor elements and provide robust support for the shade sail.
Secure with Drawstring
Once the fabric and support rods are in place, secure the shade sail by attaching a drawstring along the edges. This will allow you to easily retract or extend the canopy as needed.
Ensure that the drawstring is tightly secured to prevent sagging or flapping in windy conditions. Regularly check and adjust the tension to maintain optimal performance.

Installing the Shade Sail
Position and Fix Support Bars
To begin, determine the ideal placement for the support bars based on the shade sail’s design. Measure and mark the spots accurately. Ensure the bars are securely fixed to the ground or structure.
- Position support bars strategically
- Measure and mark accurately
- Securely fix bars to ground or structure
Next, drill holes into the marked positions for the bars. Insert the bars and use concrete to secure them firmly in place. Double-check alignment and stability before proceeding.
Connect Wire Rope
After fixing the support bars, attach eye bolts at each end of the sail where it will connect to the wire rope. Thread the wire rope through these eye bolts, ensuring a taut connection.
- Attach eye bolts at sail ends
- Thread wire rope through eye bolts
Then, tighten the wire rope using appropriate tools to achieve the desired tension level. Check for any sagging or loose sections and adjust as needed for optimal performance.
Attach to Pergola or Posts
Finally, securely fasten the shade sail to pergola or posts using turnbuckles or other suitable hardware. Adjust the tension as necessary to ensure a snug fit.
Tips for Durability and Use
Choosing the Right Fabric
When selecting a fabric for your DIY retractable shade sail, opt for materials like high-density polyethylene (HDPE) or polyester. These fabrics offer excellent durability and UV protection, essential for outdoor use. Look for fabrics with UV stabilizers to prevent fading and degradation over time.
For increased longevity, consider choosing a fabric with a higher shade factor, providing better sun protection. A higher shade factor also helps in reducing heat transmission, keeping the shaded area cooler. Ensure the fabric is water-resistant to withstand different weather conditions effectively.
Maintenance and Care
Regular maintenance is crucial for extending the lifespan of your shade sail. Clean the fabric periodically using mild soap and water to remove dirt and debris. Avoid using harsh chemicals or bleach as they can damage the fabric’s integrity. Inspect the hardware and connections regularly to ensure everything is secure and in good condition.
Proper storage during the off-season is vital to prevent damage. Remove the shade sail during harsh weather conditions like strong winds or heavy snowfall to avoid unnecessary strain on the fabric and hardware. Store it in a dry place away from direct sunlight when not in use to prevent premature wear and tear.
Seasonal Adjustments
Make seasonal adjustments to your shade sail to accommodate changing weather conditions. In summer, adjust the sail to provide maximum shade coverage during the hottest parts of the day. During winter, angle the sail to allow more sunlight into your outdoor space for warmth. Adapting the positioning of the shade sail ensures optimal comfort throughout the year.

In creating your DIY retractable shade sail, you’ve learned about the materials needed, preparing the structure, assembling and installing the shade sail, tips for durability and use, as well as insights on how to create and maintain a retractable shade sail. By following these steps, you can enjoy a customised shade solution that enhances your outdoor space while providing protection from the sun.
Now that you have all the tools and knowledge at your disposal, it’s time to roll up your sleeves and embark on this exciting project. Get ready to transform your outdoor area into a comfortable oasis with your newly installed retractable shade sail. Start gathering your materials, follow the steps outlined, and soon enough, you’ll be basking in the cool shade of your own creation.
Frequently Asked Questions
How can I determine the right materials and tools for a DIY retractable shade sail?
To ensure durability, choose UV-resistant fabric, stainless steel hardware, and sturdy poles. Essential tools include a drill, measuring tape, and wrench. Opt for high-quality materials to withstand outdoor conditions.
What are the key steps in preparing the structure for a shade sail installation?
Begin by identifying suitable anchor points and ensuring they can support the sail’s weight. Measure accurately to determine the correct size of the sail. Install any necessary fixtures securely before proceeding.
What is involved in assembling a retractable shade sail?
Lay out the sail fabric, attach it to the fixing points using tensioning devices, and adjust the tension as needed. Ensure all connections are secure and the sail is taut to prevent sagging.
How do I install a retractable shade sail correctly?
Follow the manufacturer’s instructions carefully, ensuring proper tensioning and attachment to anchor points. Regularly check the tension and hardware for any signs of wear or loosening to maintain safety and functionality.
What tips can enhance the durability and usability of a retractable shade sail?
Regularly clean the fabric to prevent dirt buildup, inspect hardware for rust or damage, and adjust tension as needed. Retract the sail during strong winds or adverse weather conditions to prolong its lifespan.
If you interest to know more information about Bali Sun Shade, you can visit our website https://balisunshadesails.com/. You can also click WhatsApp link https://wa.me/6281212333590 (Ms. Maria) to connect directly with our team.
