

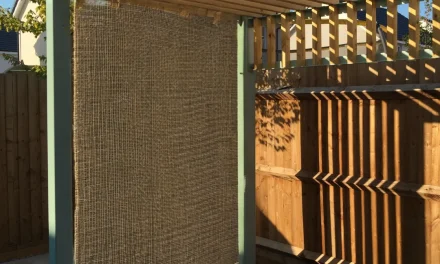
When seeking respite from the sun’s harsh rays, a sun shade sail canopy emerges as a versatile and stylish solution. Originating from ancient Egyptian and Roman times, these canopies have stood the test of time, blending form and function seamlessly. Offering both protection and elegance, a sun shade sail canopy transforms any outdoor space into a cool oasis. Whether for a backyard retreat or a commercial setting, these canopies provide relief from the heat while enhancing the aesthetic appeal of the area. Elevate your outdoor experience with a sun shade sail canopy and bask in the comfort it brings.
Planning Your Shade Sail Canopy
Choosing the Right Location
To choose the right location for your shade sail canopy, consider the sun’s path throughout the day. Look for areas with adequate space and minimal obstacles like trees or buildings. Ensure the location allows for proper tensioning of the sail.
Consider installing the shade sail in an area that provides maximum coverage during the hottest parts of the day. This will help create a comfortable outdoor space while protecting you from harmful UV rays. Take into account any potential obstructions that may affect the efficiency of the shade sail.

Measuring Surface Area
Accurately measuring the surface area where you plan to install the shade sail is crucial for a successful installation. Use a tape measure to determine the length and width of the area. Ensure to add extra fabric for tensioning and secure attachment points.
When measuring, remember to account for any obstacles or irregular shapes that could impact the size and shape of the shade sail. It’s essential to have precise measurements to ensure a snug fit and proper tensioning of the sail.
Selecting Support Structures
When selecting support structures for your shade sail canopy, consider options such as sturdy poles, existing structures like walls or columns, or even trees. Ensure that the chosen support structures are capable of withstanding the tension and weight of the shade sail.
Evaluate the sturdiness and durability of each support structure to prevent accidents or damage. Properly anchoring the shade sail to reliable support structures is essential for its longevity and effectiveness in providing shade.
Installation Preparation Tips
Footing Requirements
To ensure a sturdy foundation, consider the type of soil where you plan to install your sun shade sail canopy. Soft soils may require deeper footings to provide adequate support. Harder soils might need specialized tools for digging.
- Soft soils: deeper footings
- Hard soils: specialized digging tools
When setting up the hoist system, ensure it can withstand the weight and tension of the shade sail. Select high-quality materials such as stainless steel or galvanized steel for durability.
- Use durable materials like stainless steel
- Ensure hoist system can bear weight and tension
Setting Up Hoist System
For a secure installation, install the hoist system at a suitable height, allowing proper tension adjustment for the sail. Ensure the system is level to avoid uneven stress distribution.
- Install at suitable height
- Ensure system is level
Constructing a support pole involves choosing a robust material like treated timber or metal. Properly anchor the pole to prevent shifting during strong winds or heavy rain.
- Choose robust material
- Anchor pole securely
Step-by-Step Installation Process
Attaching to Wall or Fascia
To attach a sun shade sail canopy to a wall or fascia, begin by installing sturdy mounting brackets. Use appropriate screws for secure fastening. Ensure the brackets are level and firmly attached to prevent sagging.
Consider the material of the wall for compatibility with the chosen hardware. Bricks, concrete, or wood may require different tools for installation. Follow manufacturer guidelines for optimal performance and longevity.
Using Pole Support
When opting for pole support, select durable poles that can withstand weather conditions. Dig holes at least 2 feet deep for stability. Insert poles and fill holes with concrete for secure anchoring.
Adjust the height of the poles to create the desired tension on the sail. Use turnbuckles to fine-tune the tension and prevent sagging over time. Regularly check and readjust tension as needed for maintenance.
Tree Support Options
For tree support, choose healthy, sturdy trees with branches positioned suitably for anchoring. Protect tree bark from damage by using padded straps or protective sleeves around attachment points. Avoid causing harm to trees during installation.
Consider the growth pattern of the trees to prevent damage to both the tree and the canopy over time. Regularly inspect attachment points for any signs of wear or stress on the tree. Adjust attachments if needed to maintain structural integrity.
Ensuring Proper Tensioning
Tensioning with Ratchet Straps
To ensure proper tensioning, consider using ratchet straps for a secure and adjustable installation. Ratchet straps allow for easy tightening and adjustments to keep your shade sail canopy taut.
- Ratchet straps provide a reliable method for maintaining tension.
- They offer the flexibility to tighten or loosen the sail as needed.
Operating Strap Tensioners
Utilise strap tensioners to maintain the tension of your shade sail canopy over time. Regularly check and adjust the tensioners to prevent sagging or flapping in windy conditions.
- Strap tensioners help in keeping the fabric stretched evenly.
- Adjust them periodically to counteract any loosening due to weather changes.
Tying a Taut-Line Hitch
When tying a taut-line hitch, ensure a secure knot that can be easily adjusted when needed. This knot is ideal for maintaining tension in the shade sail canopy without slipping.
- Create a loop with the rope around an anchor point.
- Pass the working end through the loop and wrap it around the standing part.
- Finish by passing the working end through the loop again and tighten.
Important Safety Guidelines
Safety Warnings During Installation
Security is paramount during the installation of a sun shade sail canopy. Always wear appropriate protective gear like gloves and safety goggles. Before starting, ensure all tools are in good condition.
During installation, be cautious of sharp edges on the hardware used to secure the canopy. Check for any defects or damages on the sail fabric that could compromise its integrity. Avoid working under extreme weather conditions to prevent accidents.
Checking for Hazards
Inspect the installation area for potential hazards such as overhead power lines, tree branches, or uneven ground. Clear any obstacles that may interfere with the safe installation of the canopy. Securely anchor all posts or attachment points to prevent them from becoming dislodged.
- Clear debris and objects that could pose tripping hazards
- Ensure there are no underground utilities where you plan to install the canopy
Ensuring Structural Stability
Ensure that all mounting points are securely fastened to sturdy structures like walls, poles, or columns. Regularly check the tension of the canopy to prevent sagging or overstretching, which can lead to structural failure.
- Use appropriate hardware and follow manufacturer guidelines for installation
- Regularly inspect the canopy for signs of wear and tear to maintain structural stability
Final Remarks
Considering the essential steps covered in planning, installing, and maintaining your sun shade sail canopy, you are now equipped to create a shaded oasis in your outdoor space. By following the outlined guidelines diligently, you can ensure a safe and effective installation that provides both functionality and aesthetic appeal. Remember, proper tensioning and adherence to safety protocols are key to maximising the longevity and effectiveness of your shade sail canopy.
Take the time to review the installation process and safety guidelines before embarking on your project. Your attention to detail and commitment to safety will not only enhance the durability of your shade sail canopy but also contribute to a relaxing and enjoyable outdoor environment for years to come.
Frequently Asked Questions
How can I choose the right size for my sun shade sail canopy?
To determine the correct size, measure the area you want to cover carefully. Allow for some extra space for installation and tensioning. Refer to the manufacturer’s guidelines or seek advice from professionals for accurate sizing.
How do I prepare my space before installing a sun shade sail canopy?
Clear the installation area of any debris or obstacles. Ensure all necessary tools and equipment are ready. Check for any overhead obstructions that could interfere with the canopy once installed.
What tools are required for installing a sun shade sail canopy?
You will typically need tools such as a drill, measuring tape, ladder, wrenches, and ropes. Specific requirements may vary depending on the installation method and surface type. Always refer to the manufacturer’s instructions.
Can I install a sun shade sail canopy by myself, or do I need professional help?
While it is possible to install a sun shade sail canopy on your own, consider seeking professional help if you are unsure about the process or lack experience in similar installations. Professional assistance can ensure proper installation and safety.
How do I maintain my sun shade sail canopy to prolong its lifespan?
Regularly check for signs of wear and tear, clean the canopy with mild soap and water, and tighten any slack periodically. Remove snow accumulation in winter months to prevent damage. Proper maintenance can extend the life of your sun shade sail canopy.
If you interest to know more information about Bali Sun Shade, you can visit our website https://balisunshadesails.com/. You can also click WhatsApp link https://wa.me/6281212333590 (Ms. Maria) to connect directly with our team
